
Room Multi-Sensor: Part 2
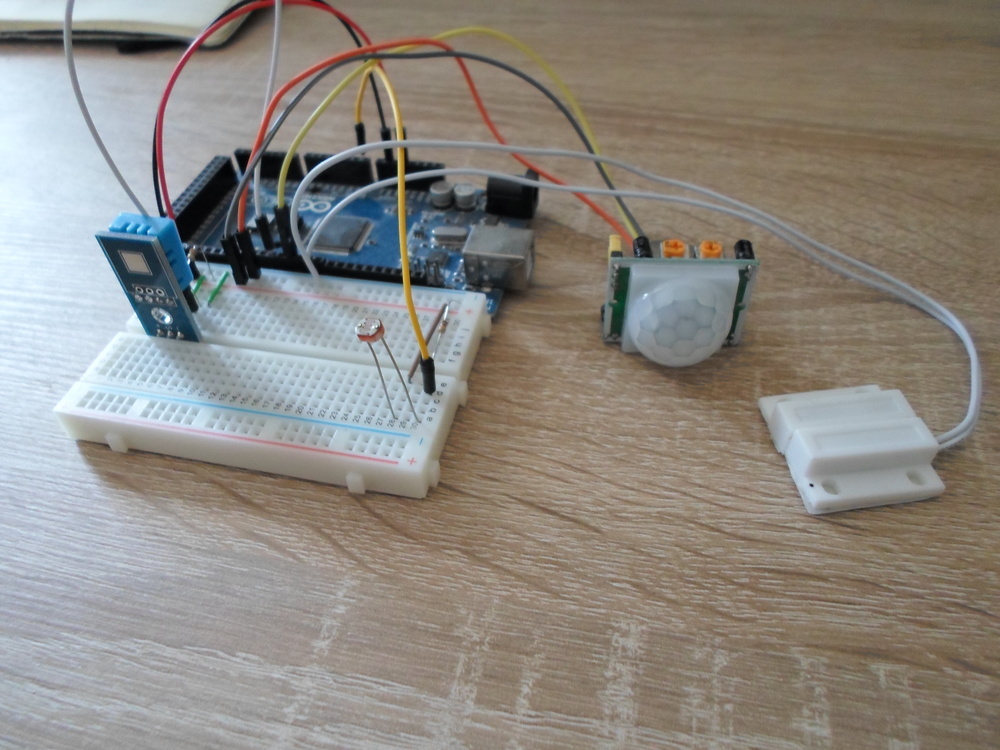
Time to actually connect some sensors to an Arduino, and start getting some readings. By the end of this post, we should have created something similar to this:

Parts List
DHT11: £1.10 each
Photoresistor: £0.20 each
PIR Sensor: £1.15 each
Reed Switch: £1.30 each
Breadboard: £0.30 each
Total: Roughly £4, plus a few pence for jumper cables and resistors and so on.
NOTE: I haven’t included the price of the Arduino unit in this list, because while it is required at this stage, it will eventually be replaced by a much smaller (and cheaper!) microcontroller.
Step 1: Adding Temperature/Humidity sensors


To connect the DHT sensor (In this case a DHT11, but the same applies to other varieties, such as the DHT22), connect the left-most pin to 5V on the Arduino. The right-most pin connects to GND, and the data pin connects to a Digital pin on the Arduino, I have chosen D2. The data pin should also be connected to 5V via a 10k resistor. Some DHT sensors, such as the one I used, only have 3 pins, meaning the data pin is in the middle. If using a DHT sensor with 4 pins, then the data pin is the 3rd pin along (next to GND). You can then use the following code to receive sensor readings on the Arduino:
1
2
3
4
5
6
7
8
9
10
11
12
13
14
15
16
17
18
19
20
21
22
23
24
25
26
27
28
29
30
31
32
33
34
35
36
37
38
39
40
//Include the DHT library (Available as DHT Sensor Library to add)

#include < DHT.h >

//DHT11 (Temp/Humidity sensor) is connected to pin 2 on the Arduino

#define DHTPIN 2

//Define the model of DHT sensor (For the DHT library)

#define DHTTYPE DHT11 // DHT 11

DHT dht(DHTPIN, DHTTYPE);

void setup() {
// Set up the Serial Monitor
Serial.begin(9600);

// Initialize the DHT library
dht.begin();
}

void loop() {
// Read humidity (percent)
float h = dht.readHumidity();
// Read temperature as Celsius
float t = dht.readTemperature();
// Read temperature as Fahrenheit
float f = dht.readTemperature(true);

//Print the sensor readings to the serial monitor to see they are         //working correctly
Serial.print("Temperature: ");
Serial.print(t);
Serial.print("\n");
Serial.print("Humidity: ");
Serial.print(h);
Serial.print("\n");
Serial.print("Farenheit: ");
Serial.print(f);
}
Step 2: Adding Light sensor

To connect the light-sensing photoresistor, connect 1 leg to 5V. Connect the other leg to an analog pin on the Arduino (I have chosen A0), and also connect it to GND with a 10k resistor
1
2
3
4
5
6
7
8
9
10
11
12
13
14
15
16
17
//Photocell (Light sensor) is connected to Analogue pin 0 (A0) on the Arduino
byte photocellPin = A0;

void loop() {
// Read photocell
int p = analogRead(photocellPin);
// Testing revealed this value never goes below 50 or above 1000,
// so we're constraining it to that range and then mapping that range
// to 0-100 so it's like a percentage
p = constrain(p, 50, 1000);
p = map(p, 50, 1000, 0, 100);

Serial.print("Light: ");
Serial.print(p);
Serial.print("\n");

}
Step 3: Adding Motion sensor
View fullsize

The PIR motion sensor has 3 pins, which should be clearly labeled (You may need to remove the white cover to find them). Connect VCC pin to 5V, GND to Ground, and Out should be connect to a Digital pin on the Arduino. I selected D4
1
2
3
4
5
6
7
8
9
10
11
12
13
14
15
16
17
//PIR (Motion sensor) is connected to pin 4 on the Arduino
byte pirPin = 4;

void setup() {
// Calibrate PIR
pinMode(pirPin, INPUT);
//digitalWrite(pirPin, LOW);
Serial.print("Calibrating PIR ");
}

void loop() {
// Read motion: HIGH means motion is detected
bool m = (digitalRead(pirPin) == HIGH);
Serial.print("Motion: ");
Serial.print(m);
Serial.print("\n");
}
Step 4: Adding Door sensor

Attach 1 wire of the Door sensor to GND, and the other wire to a Digital pin. (I chose D6).
1
2
3
4
5
6
7
8
9
10
11
12
13
14
15
16
//Reed switch (Door sensor) is connected to pin 6 on the Arduino
byte switchPin = 6;

void setup() {

// Activate the internal Pull-Up resistor for the door sensor
pinMode(switchPin, INPUT_PULLUP);
}
void loop() {
// Read door sensor: HIGH means door is open (the magnet is far enough //from the switch)
bool d = (digitalRead(switchPin) == HIGH);

Serial.print("Door Open: ");
Serial.print(d);
Serial.print("\n");
}
The Finished Circuit


1
2
3
4
5
6
7
8
9
10
11
12
13
14
15
16
17
18
19
20
21
22
23
24
25
26
27
28
29
30
31
32
33
34
35
36
37
38
39
40
41
42
43
44
45
46
47
48
49
50
51
52
53
54
55
56
57
58
59
60
61
62
63
64
65
66
67
68
69
70
71
72
73
74
75
76
77
78
79
80
81
82
83
84
//Include the DHT library (Available as DHT 	Sensor Library to add)
#include <DHT.h>

//DHT11 (Temp/Humidity sensor) is connected to pin 2 on the Arduino
#define DHTPIN 2

//Define the model of DHT sensor (For the DHT library)
#define DHTTYPE DHT11   // DHT 11

DHT dht(DHTPIN, DHTTYPE);

//Photocell (Light sensor) is connected to Analogue pin 0 (A0) on the Arduino
byte photocellPin = A0;

//PIR (Motion sensor) is connected to pin 4 on the Arduino
byte pirPin = 4;

//Reed switch (Door sensor) is connected to pin 6 on the Arduino
byte switchPin = 6;

void setup() {
// Set up the Serial Monitor
  Serial.begin(9600);


  // Initialize the DHT library
  dht.begin();

  // Calibrate PIR
  pinMode(pirPin, INPUT);
  //digitalWrite(pirPin, LOW);
  Serial.print("Calibrating PIR ");

  // Activate the internal Pull-Up resistor for the door sensor
  pinMode(switchPin, INPUT_PULLUP);

}

void loop() {
  // Read humidity (percent)
  float h = dht.readHumidity();
  // Read temperature as Celsius
  float t = dht.readTemperature();
  // Read temperature as Fahrenheit
  float f = dht.readTemperature(true);

  // Read photocell
  int p = analogRead(photocellPin);
  // Testing revealed this value never goes below 50 or above 1000,
  //  so we're constraining it to that range and then mapping that range
  //  to 0-100 so it's like a percentage
  p = constrain(p, 50, 1000);
  p = map(p, 50, 1000, 0, 100);

  // Read motion: HIGH means motion is detected
  bool m = (digitalRead(pirPin) == HIGH);

  // Read door sensor: HIGH means door is open (the magnet is far enough from the switch)
  bool d = (digitalRead(switchPin) == HIGH);

  //Print the sensor readings to the serial monitor to see they are working correctly
Serial.print("Temperature: ");
Serial.print(t);
Serial.print("\n");
Serial.print("Humidity: ");
Serial.print(h);
Serial.print("\n");
Serial.print("Farenheit: ");
Serial.print(f);
Serial.print("\n");
Serial.print("Light: ");
Serial.print(p);
Serial.print("\n");
Serial.print("Motion: ");
Serial.print(m);
Serial.print("\n");
Serial.print("Door Open: ");
Serial.print(d);
Serial.print("\n");
Serial.print("\n");

  //Add a 2 second delay to allow reading of the serial output
delay(2000);
}
Next: Connecting the sensor readings to OpenHab