
Creating my plant sensor
An office competition started recently to see who can grow the biggest chili plant which, to be honest, I really want to win. But I know that left to my own devices, I’ll completely forget to look after it. So I thought this would make a great opportunity to create another sensor unit, specifically to monitor my chili plant, and then create functions in Firebase to alert me when it needs watering! Firstly, I need to build my sensor unit. I’m using another ESP8266 (if it ain’t broke, don’t fix it!), with a DHT sensor for temperature/humidity, and a soil moisture sensor which can be placed in the plant pot. Unfortunately, this sensor also analog input, and because the ESP8266 only has the 1 Analog pin, I’ve had to make a prioritize this sensor over a light sensor. I’ve seen a few digital light sensors online, so will have to give them a try soon. But for now, this unit will be monitoring temperature, humidity, soil moisture.
I’m also going to try and run the unit from a battery. As it’s monitoring moisture levels, and will by definition be present when I’m watering my plant, I don’t really want it plugged directly into the wall. Sounds like a recipe for disaster to me!
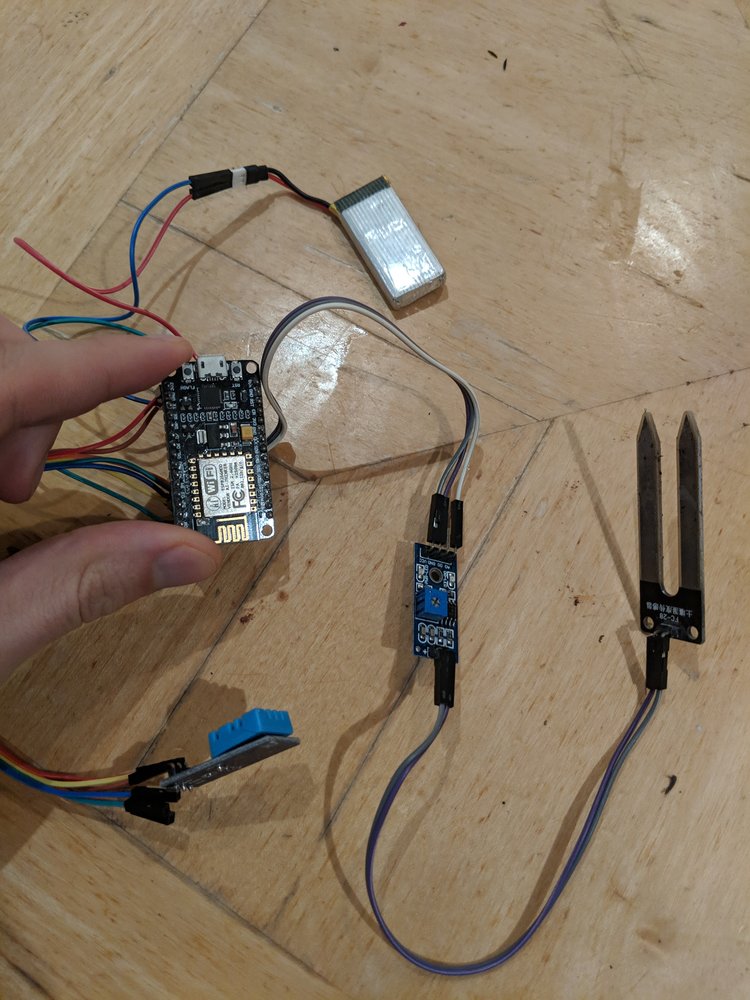
Putting it all together gives me the following result:
Because the ESP8266 has 3 3.3V pins, I can actually build this without needing a breadboard (Hurrah!), which should make for a smaller form-factor, and will help later when I need to find an enclosure for my sensor board to go in.
Because the photo isn’t the easiest to understand, I’ve wired my ESP8266 up as follows:
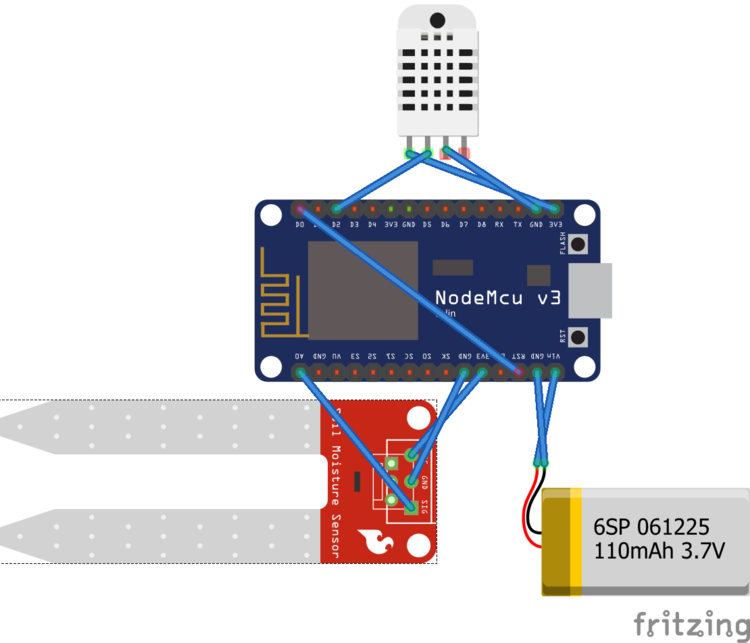
Notice the RST reset pin connected directly to the D0 digital pin of the board. This is required when using sleep functions. The digital pin sends a signal to RST, in order to kick the board into a reset.
Now, it’s time to write the code for this sensor unit. I’ve used the code for my bedroom sensor unit as a starting point, and updated it to take a soil moisture reading, instead of a light measurement. I’ve also added some code to send the board into a deep sleep, to prolong the battery life.
1
2
3
4
5
6
7
8
9
10
11
12
13
14
15
16
17
18
19
20
21
22
23
24
25
26
27
28
29
30
31
32
33
34
35
36
37
38
39
40
41
42
43
44
45
46
47
48
49
50
51
52
53
54
55
56
57
58
59
60
61
62
63
64
65
66
67
68
69
70
71
72
73
74
75
76
77
78
79
80
81
82
83
84
85
86
87
88
89
90
91
load('api_config.js');
load('api_dht.js');
load('api_timer.js');
load('api_gpio.js');
load('api_adc.js');
load('api_mqtt.js');
load('api_net.js');
load('api_sys.js');
load('api_i2c.js');
load('api_esp8266.js');

let deviceName = 'PlantSensor';
let deviceId = Cfg.get('device.id');
let topic = '/devices/' + deviceId + '/events';
print('Topic: ', topic);

let isConnected = false;
let hasPublished = false;
let qos = 1;

let dhtPin = 4; //D2
let dht = DHT.create(dhtPin, DHT.DHT11);

let getInfo = function() {
  		return JSON.stringify({
	deviceName: deviceName,
	temp: dht.getTemp(),
	hum: dht.getHumidity(),
	soilMoisture: (433-ADC.read(0))/212 * 100
  		});
};

Timer.set(10000,Timer.REPEAT, function() {
if(isConnected) {
	print('Poll Connected');
	publishData();
	} else {
	print('No connection....waiting');
	}
},null);

MQTT.setEventHandler(function(conn, ev) {
if(ev !== 0) {
	let evs = '???';
  		if (ev === MQTT.EV_CONNACK) {
		evs = 'CONNACK';
	} else if (ev === MQTT.EV_PUBLISH) {
		evs = 'PUBLISH';
	} else if (ev === MQTT.EV_PUBACK) {
		evs = 'PUBACK';
	} else if (ev === MQTT.EV_SUBACK) {
		evs = 'SUBACK';
	} else if (ev === MQTT.EV_UNSUBACK) {
  			evs = 'UNSUBACK';
	} else if (ev === MQTT.EV_CLOSE) {
		evs = 'CLOSE';
	}
print('MQTT event: ' + evs);
if(ev === MQTT.EV_CONNACK) {
	isConnected = true;
	publishData();
  	} else if (ev === MQTT.EV_PUBACK) {
if(hasPublished) {
	print('MQTT Publish confirmed - Init Deep Sleep');
	ESP8266.deepSleep(600*600*10000);
	}
	}
}
}, null);

function publishData() {
	print(getInfo());
  		MQTT.pub(topic, getInfo(), qos);
	print('Published');
	hasPublished = true;
}

// Monitor network connectivity.
Net.setStatusEventHandler(function(ev, arg) {
  		let evs = '???';
  		if (ev === Net.STATUS_DISCONNECTED) {
		evs = 'DISCONNECTED';
  		} else if (ev === Net.STATUS_CONNECTING) {
		evs = 'CONNECTING';
  		} else if (ev === Net.STATUS_CONNECTED) {
		evs = 'CONNECTED';
  		} else if (ev === Net.STATUS_GOT_IP) {
		evs = 'GOT_IP';
  		}
  		print('== Net event:', ev, evs);
}, null);
The board now starts, connects to the Wifi, and then looks for a connection to the MQTT server. Once it has this, it sends sensor values over MQTT, and once it receives confirmation the message was published, it goes into a deep sleep.
You’ll notice I’ve added the ‘api_esp8266’ library. This is required to access the deep sleep functions on the ESP8266 board.
The following code is used to take the reading of moisture level in the soil:
soilMoisture: (433-ADC.read(0))/212 * 100.
A properly messy bit of code this. The reason being that the measurement of the soil sensor in the air was 433, while the measurement in a glass of water was 212. So to get a somewhat accurate measurement, I take the reading, and then work that out as a percentage between those 2 values. I need to test this with some more soil moisture sensors, and try to get a more accurate reading.
And finally, the line ESP8266.deepSleep(60060010000); puts the unit to sleep for around 50 minutes. To be honest, this is a mostly arbitrary number. The longest an ESP8266 can be put to sleep for is 71 minutes. So ideally, it will sleep for as long as possible, without going over 71 minutes.
I then create new functions in Firebase.
1
2
3
4
5
6
7
8
9
10
11
12
13
14
15
16
17
18
19
20
21
22
23
24
25
26
27
28
29
30
31
32
33
34
35
36
37
38
39
40
41
42
43
44
45
46
/**
 	* Receive data from pubsub, then
 	* Write telemetry raw data to bigquery
 	*/
exports.pubsubReceivePlantData = functions.pubsub
  	.topic('plant-topic')
  	.onPublish((message, context) => {
	const attributes = message.attributes;
	const payload = message.json;

	const deviceId = attributes['deviceId'];

	const data = {
  	humidity: payload.hum,
  	temp: payload.temp,
  	soilMoisture: payload.soilMoisture,
  	deviceId: deviceId,
  	timestamp: context.timestamp
	};

	if (
  	payload.hum < 0 ||
  	payload.hum > 100 ||
  	payload.temp > 100 ||
  	payload.temp < -50
	) {
  	// Validate and do nothing
  	return;
	}

return Promise.all([
  updateCurrentPlantDataFirebase(data)
]);   });


/**
 	* Maintain last plant status in firebase
*/
function updateCurrentPlantDataFirebase(data) {
  		return db.ref(`/devices/${data.deviceId}`).set({
	humidity: data.humidity,
	temp: data.temp,
	soilMoisture: data.soilMoisture,
	lastTimestamp: data.timestamp
  		});
}
Plug the sensor board in and hey presto! You should now be seeing your data being sent to Firebase, with the unit turning itself off between readings. As it stands, I’m getting around 30 hours battery life with this code, which isn’t terrible, but could be a LOT better in my opinion. I’m going to write an entirely new post soon looking at reducing power consumption as much as possible, to improve the battery life.
I’m now going to look into creating more functions in Firebase to alert me when my chili plant needs watering, but will save that for another post also. So watch this space!