
Part Two - Sending data to Google Cloud
In a recent post, I created some wifi-connected room sensors, with the aim of sending data from those units to Google Cloud, to store and analyse in the future. Now it’s time to create the project in Google, and receive the measurements sent by my room sensors.
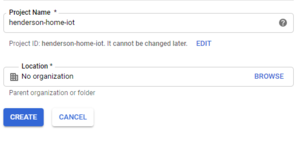
Firstly, I need to create a project in Google Cloud Console. Visit https://console.cloud.google.com, and create a new project:
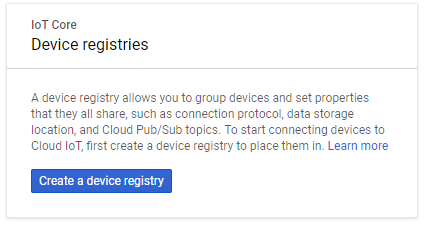
Once the project has been created, navigate to Google IoT Core, and enable the API when asked to do so.
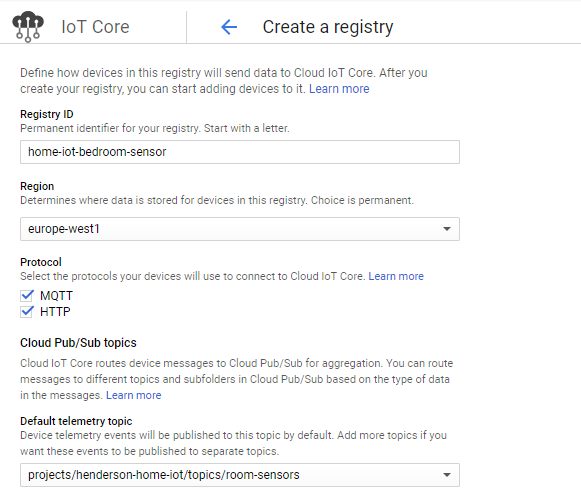
You will then be asked to create a device registry:
Make sure you give the device a unique name (I’ve decided to use the convention of ‘projectname - roomname - unittype’, but feel free to use whatever you like), as well as selecting the data center to store the data in, and a default telemetry topic (I want my room sensors to all publish measurements to the same topic, so I’ve just used the generic ‘room-sensors’ for my topic):
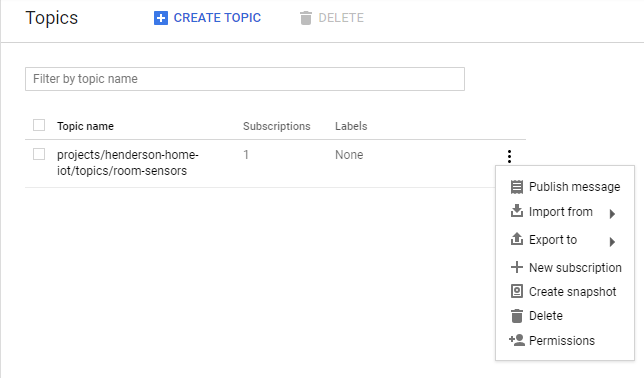
After you’ve done this for each sensor unit you have, you need to navigate to Google Pub/Sub, and enable the API there.You will then need to create a Pub/Sub Topic, to post your measurements to, and a subscription to pull published messages for that topic.
To do this, create a Topic under Pub/Sub, and then under the menu for your Topic, create the Subscription:
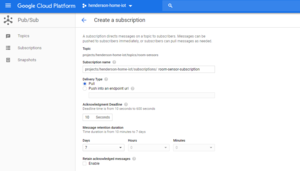
Creating your Subscription should look like this (obviously you can call yours whatever you like):
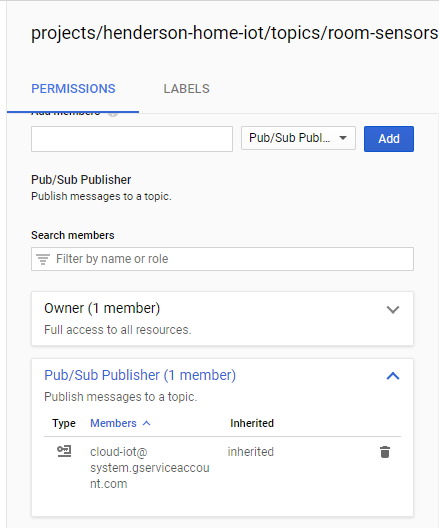
The final step on the Cloud Console is to create the Pub/Sub Publisher, using the following account: cloud-iot@system.gserviceaccount.com. This allows your IoT Core devices registered earlier to publish messages to Google Pub/Sub
That’s it for the Cloud Console for now. Next, we need to load up Mongoose, and update our room sensors to hook them up to the device registries we just created.
Now, it’s time to update the code on the device to actually send the sensor measurements over MQTT.
The finished code for my sensor board looks like this:
1
2
3
4
5
6
7
8
9
10
11
12
13
14
15
16
17
18
19
20
21
22
23
24
25
26
27
28
29
30
31
32
33
34
35
36
37
38
39
40
41
42
43
44
45
46
47
48
49
50
51
52
53
54
55
56
57
58
59
60
61
62
63
64
65
66
67
68
69
70
71
72
73
74
75
76
77
78
79
80
81
82
83
84
load('api_config.js');
load('api_dht.js');
load('api_timer.js');
load('api_gpio.js');
load('api_adc.js');
load('api_mqtt.js');
load('api_net.js');
load('api_sys.js');

let deviceName = 'AntBedroom';
let deviceId = Cfg.get('device.id');
let topic = '/devices/' + deviceId + '/events';
print('Topic: ', topic);

let isConnected = false;

let dhtPin = 4; //D2
let dht = DHT.create(dhtPin, DHT.DHT11);

let pirSensor = 13; //D7
// Blink built-in LED every second
GPIO.set_mode(pirSensor, GPIO.MODE_INPUT);

let getInfo = function() {
  return JSON.stringify({
deviceName: deviceName,
temp: dht.getTemp(),
hum: dht.getHumidity(),
light: ADC.read(0),
pir: GPIO.read(pirSensor)
  });
};

Timer.set(
	  60 * 1000,
  true,
  function() {
if (isConnected) {
  publishData();
}
  },
  null
);

Timer.set(
  5000,
  true,
  function() {
    print('Info:', getInfo());
  },
  null
);

MQTT.setEventHandler(function(conn, ev) {
  if (ev === MQTT.EV_CONNACK) {
    print('CONNECTED');
    isConnected = true;
    publishData();
  }
}, null);

function publishData() {
  let ok = MQTT.pub(topic, getInfo());
  if (ok) {
    print('Published');
  } else {
    print('Error publishing');
  }
}

// Monitor network connectivity.
Net.setStatusEventHandler(function(ev, arg) {
  let evs = '???';
  if (ev === Net.STATUS_DISCONNECTED) {
    evs = 'DISCONNECTED';
  } else if (ev === Net.STATUS_CONNECTING) {
    evs = 'CONNECTING';
  } else if (ev === Net.STATUS_CONNECTED) {
    evs = 'CONNECTED';
  } else if (ev === Net.STATUS_GOT_IP) {
    evs = 'GOT_IP';
  }
  print('== Net event:', ev, evs);
}, null);
You can see an extra timer to send measurements over MQTT every 60 seconds. It’s not as frequent as the timer to send measurements to the MOS console, as it’s not needed, plus Google have limits on usage before they start charging, so we want to get out of the habit of spamming Google if it isn’t needed.
Now, we need to run the following commands in MOS:
1
2
3
4
5
6
7
mos build

mos flash

mos wifi SSID PASSWORD

mos gcp-iot-setup --gcp-project PROJECT_NAME --gcp-region REGION_NAME --gcp-registry REGISTRY_NAME
In order, these commands will build the latest saved version of your Mongoose code, flash it onto your device, connect to your wifi, and register the device on your Google IoT Core registry.
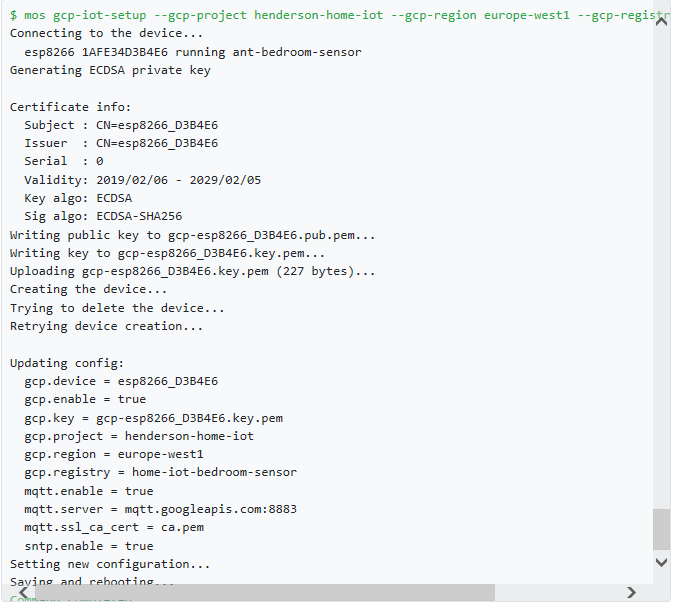
So for the example of my bedroom sensor, the command is as follows:
1
mos gcp-iot-setup --gcp-project henderson-home-iot --gcp-region europe-west1 --gcp-registry home-iot-bedroom-sensor
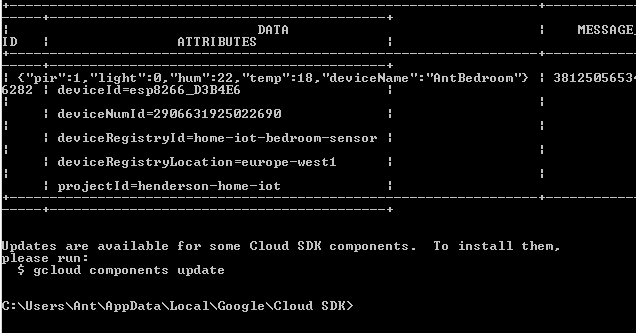
If all goes to plan, you should see the following in your mos console:
You can now run the following command in Google Cloud command line:
1
gcloud beta pubsub subscriptions pull --auto-ack SUBSCRIPTION_NAME
And if your data is sending to Google correctly, your results will look like this:
….And we’re done! We managed to create a Google Cloud project, and send sensor data to it over MQTT!
Next, we’ll store that sensor data in a Google BigQuery table, and begin to query that data!