
Part One - Building the sensor unit
A previous project for my website was focused on creating a multi-room network of sensors, which would relay data via radio back to a Raspberry Pi, which was acting as a central hub in my house. And while that solution did a job, it always felt a bit like a temporary fix to a problem, as it was dependent on maintaining a radio connection to the Pi. It also only stored data locally, which meant any drop in power to the Pi, or if I ever needed to move it to a different room, then that data was lost. I could develop a solution to back up that data online somewhere, but to me it makes more sense to upgrade the sensor units themselves, and cut out the Raspberry Pi altogether.
So instead of a ATmega328p unit with a radio transmitter, I’ve decided to recreate my sensor units on a ESP8266, which has a built-in WiFi chip, meaning I can broadcast data directly to Google, using their Cloud Functions capabilities.
This post is going to look at building the ESP8266 devices, with sensors to monitor temperature, humidity, light levels and motion. I’m not going to integrate door sensors at this point, as data will only be posted on 10 minute intervals, as opposed to every time a trigger event (such as opening/closing a door) occurs. I’ll explain the reasoning behind that a little later on.
Part 2 of this series’ will focus on creating the project in Google, receiving the data from the sensor units, and using BigQuery to store the values in a database.
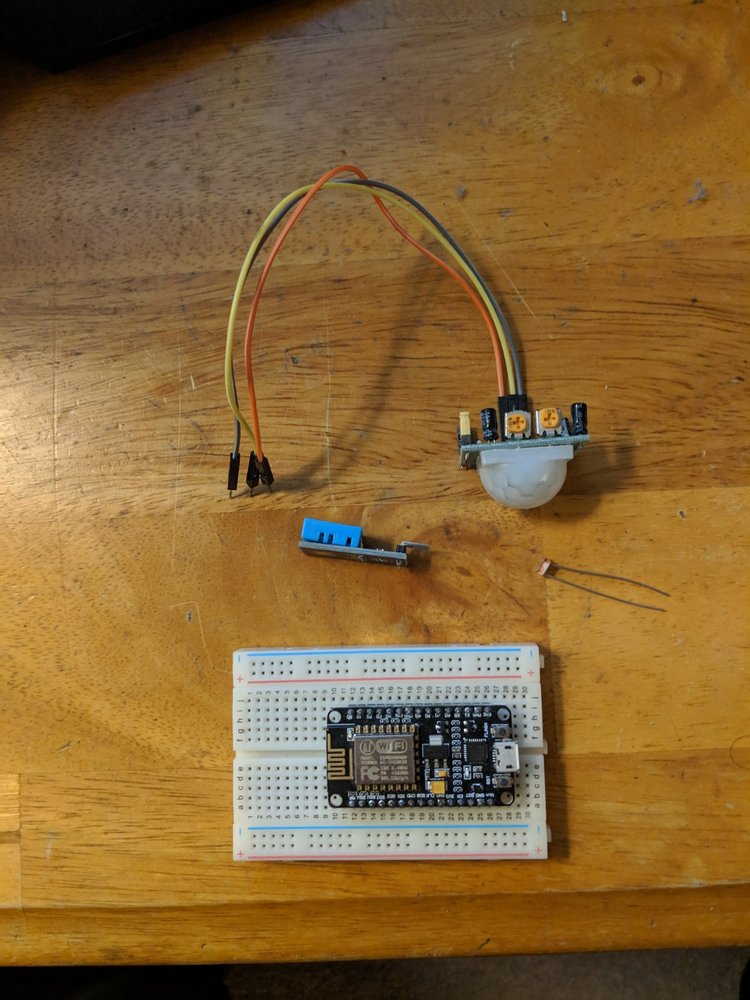
To build my sensor units, I’m going to use the following components:
ESP8266 module
DHT11
Photoresistor
PIR sensor
A breadboard, plus a few jumper cables, resistors etc.
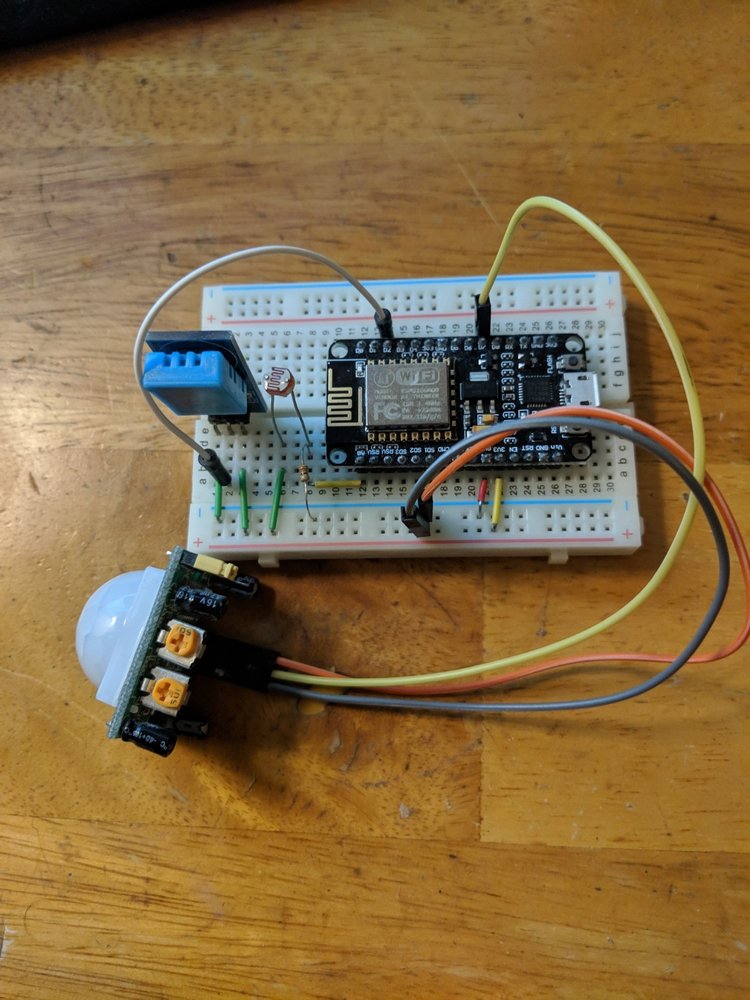
The DHT unit needs to be hooked up to GND and 3V3 for power, with the data pin connected to one of the Digital pins on the ESP8266 . (I’ve used D2).
The photoresistor needs to go to GND (via a resistor) and 3V3, with the GND leg of the photoresistor hooked up to the A0 pin on the ESP8266, as it’s an analogue output.
The PIR unit needs to be connected to GND and 3V3 for power, with the central data pin connected to one of the Digital pins. (I’ve used D7).
When that’s all hooked up, you should have a board that looks similar to mine:
Now the sensor unit itself is built, it’s time to hook it up with the other really cool platform in this project - Mongoose OS
MONGOOSE OS
Mongoose is an operating system designed specifically for ESP/similar WiFi units. It makes it super easy to get up and running with a WiFi connection, and has a ton of samples out the box. You can find full details of the platform here, but suffice to say, it allows us to test the WiFi-connectivity while flashing the device, and easily deploy these settings to multiple devices, which is definitely a massive bonus in this project!
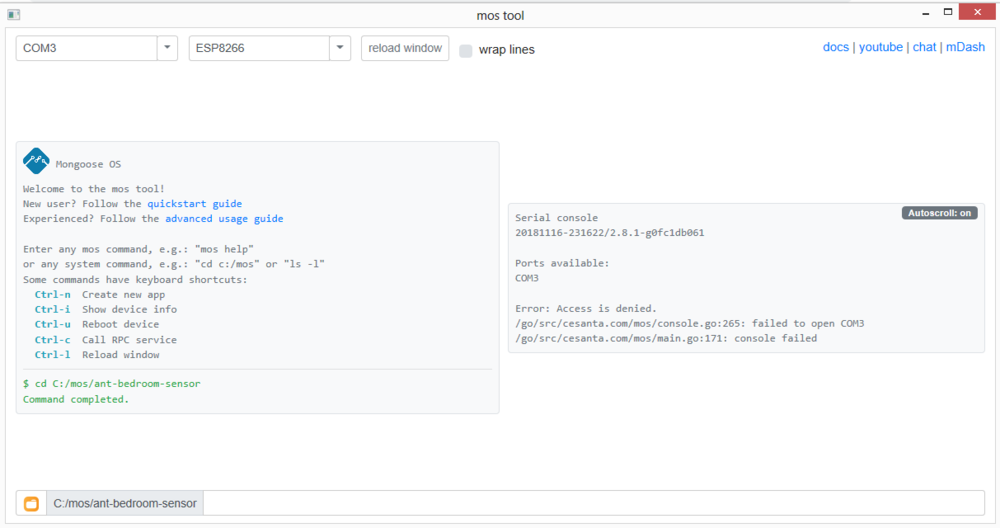
The link to download the Mongoose OS (MOS) tool can be found here. Once you’ve downloaded and installed, it should lead to the following screen, where you can select the device you wish to flash:
Now, we need to create a new program to upload to the ESP8277 chip. I find it easier to import the demo app into a local folder, and then just update the files we need to change.
Enter the following command:
1
mos clone https://github.com/mongoose-os-apps/demo-js **[APPNAME]**
When you’ve finished cloning this project, it will automatically navigate the command line to the project folder on your PC. If you navigate to that folder, you can edit the code in the init.js file, to read data from our sensors.
The first part of the program loads the libraries we will need:
1
2
3
4
5
6
load('api_config.js');
load('api_rpc.js');
load('api_dht.js');
load('api_timer.js');
load('api_gpio.js');
load('api_adc.js');
These libraries need to be included in the mos.yml file, which I will detail later.
We then need to declare the sensor values that we will be posting, along with the name of the topic that we will eventually be pushing over MQTT to Google:
1
2
3
4
5
6
7
8
9
10
11
12
13
let deviceName = 'AntBedroom';
let deviceId = Cfg.get('device.id');
let topic = '/devices/' + deviceName + '/events';
print('Topic: ', topic);

let isConnected = false;

let dhtPin = 4; //D2
let dht = DHT.create(dhtPin, DHT.DHT11);

let pirSensor = 13; //D7
// Blink built-in LED every second
GPIO.set_mode(pirSensor, GPIO.MODE_INPUT);
We then need to create a function that we will call whenever we want to get the latest values from our sensors:
1
2
3
4
5
6
7
8
9
10
11
12
13
14
15
16
17
18
19
let getInfo = function() {
  return JSON.stringify({
deviceName: deviceName,
temp: dht.getTemp(),
hum: dht.getHumidity(),
light: ADC.read(0),
pir: GPIO.read(pirSensor)
  });
};

Timer.set(
  5000,
  true,
  function() {
GPIO.set_mode(pirSensor, GPIO.MODE_INPUT);
print('Info:', getInfo());
  },
  null
);
I’ve included a timer, which will call the getInfo function every 5 seconds, and print the values to the console.
The mos.yml file should have the following contents:
1
2
3
4
5
6
7
8
9
10
11
12
13
14
15
16
17
18
19
20
21
22
23
24
25
26
27
author: [Your Name]

description: [Add your own description here[

	version: 1.0

manifest_version: 2017-05-18
libs_version: ${mos.version}

modules_version: ${mos.version}

mongoose_os_version: ${mos.version}

config_schema:
  - ["mqtt.server", "iot.eclipse.org:1883"]
  - ["i2c.enable", true]

tags:
  - js

filesystem:
  - fs

libs:
  - origin: https://github.com/mongoose-os-libs/boards
  - origin: https://github.com/mongoose-os-libs/js-demo-bundle
  - origin: https://github.com/mongoose-os-libs/dht
If you now compile the code using the following MOS command:
1
mos build
And flash to the device using the following MOS command:
1
mos flash
You should see the output displayed via the mos console command in the Terminal:
1
Info: {"pir":1,"light":8,"hum":47,"temp":21,"deviceName":"AntBedroom"}
For debugging purposes, we can output the values every few seconds, though we will only push to Google over MQTT every 10 minutes. However, I’ll cover all that in Part 2……